Simple Pinterest Adventures
Here goes my pinterest adventure! Ever since Whitney peer-pressured (persuaded) me to join pinterest, I have found many craft projects that I wanted to try. I banned myself from looking at clothes and housing items because I knew I would want them too badly and either 1. be miserable or 2. spend money I don't have. BUT, the craft section is more like artistic challenge to me :), so I perused.
One thing I found that looked extremely simple and yet totally full of purpose, especially in my own home, was this note board. Everyone needs a place to put the cards they receive that they don't want to pack up yet or trash (I never throw out any cards), or the bills for the month that they need to pay come the first of the month, or random slips of paper like the shopping list or a receipt you need to keep out. Where do we put those? My husband creates a pile of papers on his desk. (so annoying). I place mine in a drawer or in between books on the bookshelf usually. I try to set up the cards, but there isn't often much space for that- SO this idea for a note board seemed to solve my problems. All I needed was:
1. a frame
2. some burlap
3. some hot glue and tape
4. scissors :)
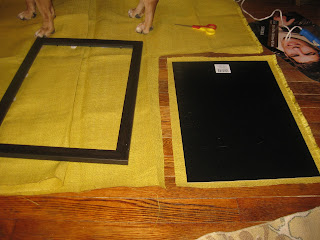
First, I found an old frame and ordered some pretty yellow burlap from amazon. I also ordered a blue color as I will be making a second one of these to remedy the piles of paper on Jesse's desk :). You don't need the glass from the picture frame, but you do need to save the backing.
1. Line the backing of the frame with burlap (don't mind the doggy paws. he wanted to help).
2. cut out strips of burlap (fold the edges to keep it nice and neat) and hot glue them in segments across the back piece. keep the top of the strip open for sticking things inside.
3. Make as many rows as you like. You can also choose a landscape or portrait position. I chose to make three rows.
4. Afterward, use hot glue and tape to securely tuck all edges around the backing and then fit it into the frame.
5. Hang it on the wall, and wah-lah! You've got a nice little note board there :) You can stick things inside the burlap pockets and you can also use push pins (like you use for sewing) to pin things to the outside of the burlap (like if you have a picture you want to be shown more fully).
This entire project (not including the purchasing of the supplies) took me about 25 minutes to do :). It's so quick and simple, and I feel like it is as useful as any $25 to $30 contraption you might buy at the store- PLUS it has a more vintagey feel. And to get useful 'vintagey-feeling' pieces, you usually have to pay even more :). So weeeeee make lots of these :) Maybe I'll give them as gifts at Christmas. Let me know if you want one and what color burlap you'd like. On my next one, I think I'm going to pain the frame a different color.


Comments
- Em